
Windows 11 is released though still in Dev channel. It is a fun to have a play with it I actually installed it on the so outdated Surface Pro 4 with low spec (Intel Core m3-6Y30 with 4GB ram) and have to say Windows 11 feels bring a new life to this kind of old device. It runs quite smooth as well on the SP4. Here is a quick share of how to install the windows 11, while I am typing this the latest version is: (co_release).
Get the ISO
Sign up or use your existing MS account and join the Insider Program, or another easier way, just grab the iso from UUDP (https://uupdump.net/). If you choose UUDP, after selecting the variation, a zip file would be downloaded and you need to unzip it, run the script to download the ISO, if you see something similar below and get an .ISO in your folder then it is completed. If you feel any difficulty with this step please let me know.

Burn the ISO to USB
In order to install it to the Surface Pro 4, I burnt the downloaded ISO to a USB driver using Rufus (https://rufus.ie/en/), it is very straightforward, just select the right Device for your USB drive and the correct ISO and all other options the default values are used.
If you’re looking for installing it on VM, no need to do this step.
Install Windows 11 on Surface Pro 4
It is actually quite easy as well, with USB drive prepared in the step above, I plugged it in to the SP4 directly under windows 10, then just initiated the setup by running the setup.exe from the prepared USB drive. To save time the updates downloading was skipped by clicking the blue line of “Change how Setup downloads updates” and choose “Not right now”. The installation actually doesn’t need internet connection until asking you to login using your MS account after the installation. Just a few clicks and left it run for a while it is fine. I didn’t keep anything on the SP4 to make it like a fresh install. It would reminds you some thing about the language change。
This method might be easier as boot from USB on Surface is quite a complicated thing and it indeed worked quite well.


After the installation, your SP4 should have a brand new Windows 11 up and running, thought might not be stable yet. As far as I know there is no major problem yet. The only thing it happens is while the installation, the on-screen keyboard will not pop up for input for example Wifi password etc. I have to connect a physical keyboard to it to finish the setup other than that every thing works nicely.

Install Windows 11 on a VM
Another great way to try out the windows 11 is to install it onto a virtual machine, I am using the VirtualBox (https://www.virtualbox.org/) with Hyper-V support and all

Make sure Windows 10 (64-bit) is selected.


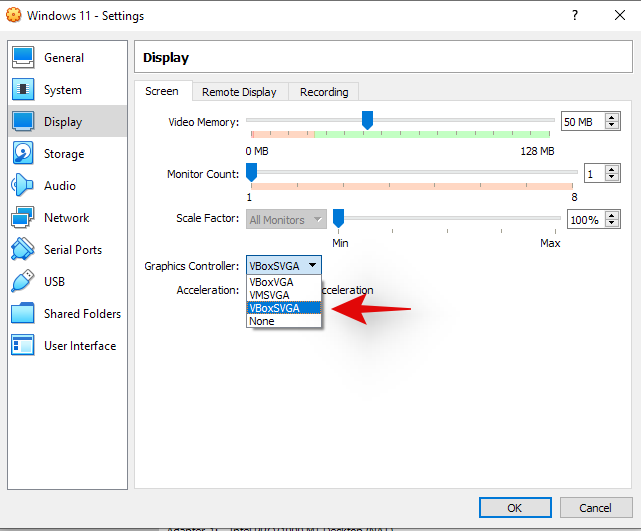
In the VM setting, double check Graphics Controller is selected to: VBoxSVGA, otherwise might have that “This PC can’t run Windows 11” error (picture from Google).

While asking for the key just choose “I don’t have a product key” and pick up your preferred version of Windows 11 for test should be fine.

However, you might see the error saying your PC can’t run Windows 11, like below:

It’s fine we could try to bypass this by pressing “shift + F10” on your keyboard to get the command prompt, then type “regedit” for Registry Editor

navigate to HKEY_LOCAL_MACHINE\SYSTEM\Setup, right-click on the Setup key and select New > Key to create LabConfig and press enter, then right-click on the LabConfig key and select New > DWORD (32-bit) value and create a value named BypassTPMCheck, and set its data to 1. Now create the BypassRAMCheck and BypassSecureBootCheck values and set their data to 1. Close the Registry Editor and Command prompt.

Now should be ok to go ahead by press back button and select the version again, and do the rest and normal Windows 10 installation.

After several restart, your new Windows 11 should be ready to be configurated.


Leave A Comment